Fun with Fumes
Monday, September 21. 2009
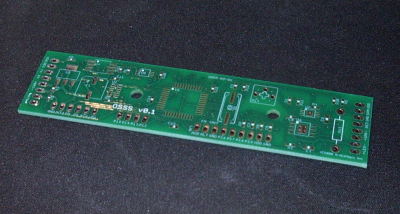
 Remember when I mentioned a prototype for an electronics project I was working on? Well, after I had breadboarded it up, I used Eagle to put together a schematic and to lay out a circuit board. Then I ordered three prototype boards from Sunstone Circuits for $61, including shipping. I was pleasantly surprised at how quickly I got the boards. They came in on Friday, and they looked great! They even threw in an extra board—must've had extra space on the panel.
I needed this board to be very small—eventually, I'll reveal why—so I planned to use surface-mount parts throughout. I'd never worked with SMT before, other than to hand-solder a few tiny passives onto a practice board. One of my components (this one) only comes in what's called an LGA package—basically, there are no leads to solder, only pads on the bottom of the chip! Thus, there's no way to hand-solder it. So, I had to turn to a technique I'd only read about on the web: toaster-oven reflow soldering.
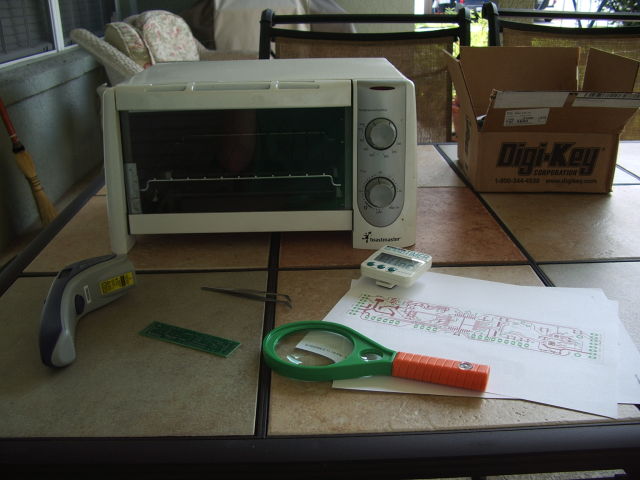
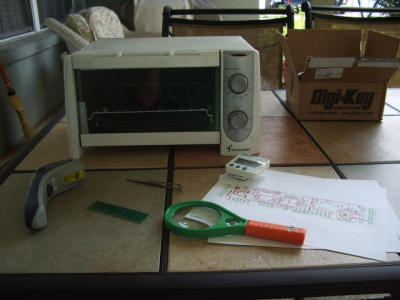 I had already bought solder paste and [almost] all the components I'd need from Digi-Key and Newark, so late Friday afternoon I gathered an old toaster oven, tweezers, a magnifying glass (with compass, of course), an infrared thermometer, a timer, and all the non-through-hole parts for my prototype. Some people have designed high-tech digital controllers for their toaster ovens to keep them on the manufacturer-recommended temperature profiles, but many people have just cranked the oven up and let it do its thing for a specified "safe" amount of time. I opted for the latter approach.
First I applied the solder paste, hoping I was getting the right amount on each pad. Too much would lead to little solder balls or bridging between nearby pads, while too little would fail to bond the part to the board. Next came the long game of "Operation!"—sans buzzer, thankfully—wherein I used the tweezers to place/drop/nudge each little part onto its appointed spot. I only lost two passives, one resistor and one capacitor. This is why we order 5% extra.
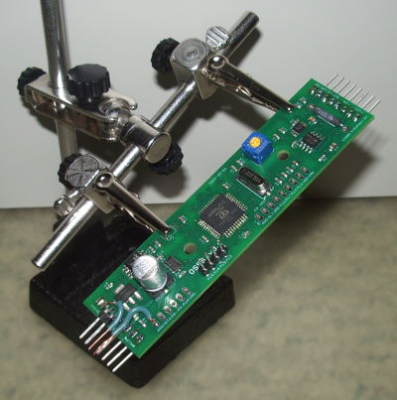 Then, into the oven. I was worried at the five-minute mark when nothing seemed to be happening except the production of some (probably toxic) fumes. Suddenly, as I watched, the solder paste became silvery and flowed, like magic. As the web had counseled me, I let the board sit in the oven for another 20 seconds or so, then turned off the heat and opened the door. I only had four bridges between adjacent fine-pitch IC pins, which were fairly easy to clean up with some desoldering wick. I hand-soldered the few through-hole parts, and voila! A finished SMT prototype board!
Well, less one part. I somehow forgot to order the EEPROM. Luckily, the prototype will work fine without that chip, it's just unable to leave its tether to the PC (unless it never loses power). I ordered the missing part on Saturday and should have it in hand this week.
I was more than a little surprised that this whole process had worked. I was a little less surprised when I hooked the board up to the programming interface and the microcontroller couldn't be found. A little green-wiring fixed that problem (visible in the image).
Everything tested out great except the EEPROM (missing) and the ADXL345. For the latter, I had accidentally connected one of those hidden pads to ground instead of positive voltage. (It was a result of some confusing labeling on the datasheet and...well...never mind.) This, sadly, is not a problem that could be fixed on the board. So I went back to Eagle, revised the schematic and the board layout, made a few other little adjustments, triple-checked everything three times, and sent the files off to Sunstone for version two of the prototype board. I should get the new boards in a couple of weeks. Then, we'll start the process again, only this time, I expect everything to work...
Comments
Display comments as
(Linear | Threaded)
Add Comment
 Remember when I mentioned a prototype for an electronics project I was working on? Well, after I had breadboarded it up, I used Eagle to put together a schematic and to lay out a circuit board. Then I ordered three prototype boards from Sunstone Circuits for $61, including shipping. I was pleasantly surprised at how quickly I got the boards. They came in on Friday, and they looked great! They even threw in an extra board—must've had extra space on the panel.
I needed this board to be very small—eventually, I'll reveal why—so I planned to use surface-mount parts throughout. I'd never worked with SMT before, other than to hand-solder a few tiny passives onto a practice board. One of my components (this one) only comes in what's called an LGA package—basically, there are no leads to solder, only pads on the bottom of the chip! Thus, there's no way to hand-solder it. So, I had to turn to a technique I'd only read about on the web: toaster-oven reflow soldering.
 I had already bought solder paste and [almost] all the components I'd need from Digi-Key and Newark, so late Friday afternoon I gathered an old toaster oven, tweezers, a magnifying glass (with compass, of course), an infrared thermometer, a timer, and all the non-through-hole parts for my prototype. Some people have designed high-tech digital controllers for their toaster ovens to keep them on the manufacturer-recommended temperature profiles, but many people have just cranked the oven up and let it do its thing for a specified "safe" amount of time. I opted for the latter approach.
First I applied the solder paste, hoping I was getting the right amount on each pad. Too much would lead to little solder balls or bridging between nearby pads, while too little would fail to bond the part to the board. Next came the long game of "Operation!"—sans buzzer, thankfully—wherein I used the tweezers to place/drop/nudge each little part onto its appointed spot. I only lost two passives, one resistor and one capacitor. This is why we order 5% extra.
 Then, into the oven. I was worried at the five-minute mark when nothing seemed to be happening except the production of some (probably toxic) fumes. Suddenly, as I watched, the solder paste became silvery and flowed, like magic. As the web had counseled me, I let the board sit in the oven for another 20 seconds or so, then turned off the heat and opened the door. I only had four bridges between adjacent fine-pitch IC pins, which were fairly easy to clean up with some desoldering wick. I hand-soldered the few through-hole parts, and voila! A finished SMT prototype board!
Well, less one part. I somehow forgot to order the EEPROM. Luckily, the prototype will work fine without that chip, it's just unable to leave its tether to the PC (unless it never loses power). I ordered the missing part on Saturday and should have it in hand this week.
I was more than a little surprised that this whole process had worked. I was a little less surprised when I hooked the board up to the programming interface and the microcontroller couldn't be found. A little green-wiring fixed that problem (visible in the image).
Everything tested out great except the EEPROM (missing) and the ADXL345. For the latter, I had accidentally connected one of those hidden pads to ground instead of positive voltage. (It was a result of some confusing labeling on the datasheet and...well...never mind.) This, sadly, is not a problem that could be fixed on the board. So I went back to Eagle, revised the schematic and the board layout, made a few other little adjustments, triple-checked everything three times, and sent the files off to Sunstone for version two of the prototype board. I should get the new boards in a couple of weeks. Then, we'll start the process again, only this time, I expect everything to work...
Comments
Display comments as
(Linear | Threaded)
Add Comment